Don’t Know Where to Start?
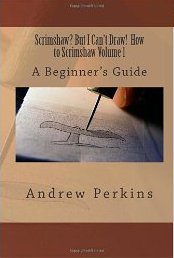 For a limited time, we are including an excerpt from Chapter 5 of “Scrimshaw? But I Can’t Draw!” so you can start learning how to scrimshaw on any hard surface, including mammoth ivory, corian, acrylic – even a light switch cover!
——-
You are going to learn one of several ways to transfer your artwork to your ivory or material of choice:
First things first:
- You need your materials and your tools, including your scribe, a bright light, and some type of magnification
- You need your ink or oil paint and rags
- You need your eye protection and your dust mask (if you’re sanding down anything)
- You need your Bees Wax
or Renaissance Wax
- You need your computer (or a copier that can reduce your picture/project of choice
- And, Scotch tape
The first thing you will want to do is measure the piece you’re going to scribe, then create an image about ⅛” smaller all around, using your computer and a laser printer or an inkjet printer. Many copiers will shrink images as well. You won’t want your image to reach the edge, though you can get close. If you are working with an oval, use your computer to draw an oval around the piece as well, so you will know that it is centered.
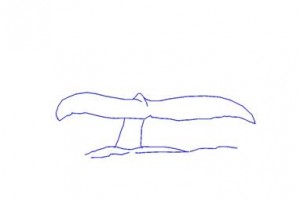
With this technique you will be copying the old whaleman’s way of creating scrimshaw. .
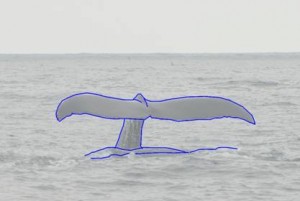
Cut out a copy of the image you wish to scrimshaw and leave ½” to 1” on all of the sides. Carefully secure your material to your work surface, then secure the print over the top of your material, taping it so it will not shift as you move your work surface. Be sure your work is aligned properly!
I worked on a piece in 2010 for the Williamsburg Congregational Church’s annual craft fair, and once I’d finished the main work, found that I was about ten degrees off, as shown on the picture above. Looks like it’s going down a hill! I kept this old one as a reminder to myself (shown at the beginning of the chapter), re-scrimshawed the church on a new piece of ivory after aligning the work properly. They raffled it off, and it drew quite a bit of interest.
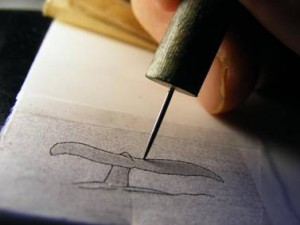
Press the point in as vertically as possible. This will create the most consistent dot, an angled dot’s ink will wipe out of the indentation more or less, depending on the angle and the angle you wipe away the excess with, where a vertical dot will remain consistent.
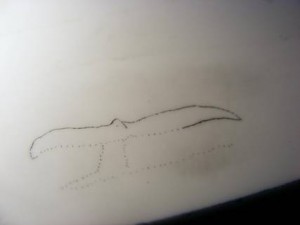
You will want to pierce the paper only along the prominent lines. This will be your “dot-to-dot” for creating your piece. Here, The whale fluke from the previous chapter has been outlined and the actual picture faded using GIMP 2.6 (similar to PhotoShop).
Pierce along the lines about every 1/32″ (or 1mm) so you can visualize the fluke easily. You may want to add the horizon line as well.
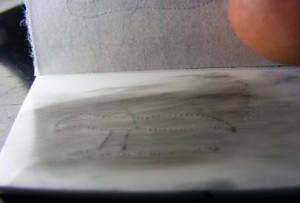
Now that you have finished creating the dots, remove the paper and inspect it under a bright light. You should be able to see the indentations and see where you are going to scribe your lines. Using a Q-Tip or a small brush, coat the ivory with ink or black oil paint and quickly wipe it off with a soft cloth (tissue may actually scratch it or leave lint, so the old t-shirt your spouse has been complaining about would be perfect!). The dots should be visible enough that you can now place it under your magnification and begin carefully scribing the lines.
Here, you are lightly scribing from one dot to the next. Scribe enough so you can see the line when you wipe ink or oil paint onto it, then right off again (I am using oil paint, my preference changed to oil paint after an interview with Bob Hergert).
Once you have finished scribing the lines, take a break, take a picture of it! Thanks to digital cameras, you can document your work every step of the way.
Tip – if you are “checking your work” by repeatedly coating your ivory with ink to see where you’ve been, wipe it off immediately – don’t let it dry and then burnish it off. Better yet, use a little bit of oil paint: it stays liquid longer and doesn’t dry to a hard finish for at least a week.
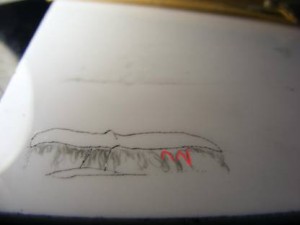 Now we come to decision time: Do you want to add the water dripping off the back of the fluke, even if you can’t draw? You can make “V” shapes and “\ /” shapes (open bottomed V’s), right? Using a very soft lead pencil or colored pencil (as long as it’s soft lead), you can draw the water flowing off the tail of the whale by making these shapes across the bottom of the tail, varying the width between them. Don’t worry, if you don’t like it, you can just wipe it off and start again. Once the open V’s are drawn on, you can close them by adding a “U” to the bottom of them, making them bulge slightly in the middle, and adding a drop or two shaped like the letter “o” below them. Use a pencil and see what you come up with either on your scrimshaw or on a separate piece of paper.
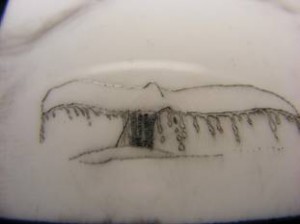
This concludes the excerpts from “Scrimshaw? But I Can’t Draw! Volume 1 – A Beginner’s Guide“
Scrimspirations, easy to use templates are available through Etsy.com, including “Tall Ships and Sea Life”, “Mermaids and Monsters” and the popular “Scrimspirations, Book 1”.
For more images, try “The Scrimshander’s Secret Scrapbook of Whaling Era Images“ available from Lulu.com! If you’re looking for materials to scribe, go to our scrimshaw products page.
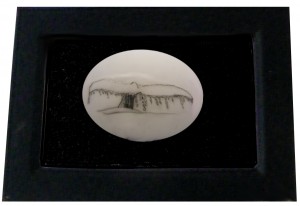

Just finished up the Udemy.com version of this course and found it really helpful. I am really happy with my first few initial pieces that came out of the class (whale tale, ship and rose) and am looking forward to practicing. If you’re interested in learning, the course is a good option.
Thanks Andrew!
Thank you, Brian! Let me know if there are any places you need further info, and I’ll be glad to help!
Andrew
Would love to see some of this lost art & where you might find it ” for sale ” !
Thank You for all info :
Hi, I am from Canada and live in Germany. I bought an old tiger-tooth from the mid 18hundreds looking at the goldwork on the tooth. It was really in bad shape, almost split in half, did get it all professionaly repaired. I would like to know if it can be scrimshawed. And if it can, maybe you know somebody in Germany that does this. Or maybe you or somebody in Canada. Thanks a lot. Looking forward to your answer. Best regards George.
Hi George, and thanks for writing! The tiger tooth sounds interesting to say the least. Since this is an ivory it can be scrimshawed. I know in the states they’re getting so obsessive the tooth fairy has a wanted poster displayed in our post office, hoping this is not the case in Canada and Germany. As to scrimshaw artists in either country, I’d be glad to put up a post asking if anyone in Canada or Germany is currently taking on custom scrimshaw work. Hope it works out for you and we’d love to see pictures, too!
if i can,t do scrimshaw is there any one in the philippines that you can recommend that i can do it for me
Hi Glen,
I’m not familiar with any scrimshaw artists in the Philippines. If you live there you may have the market to yourself! I have seen scrimshaw on water buffalo horn an on different shells from the Philippines, so I am sure there are artists out there that do this type of work.
Andrew
What and where do I get the black ink or oil paint? I would like to try to scrimshaw an ostrich egg.
Interesting! I’ve never done that before, but since it’s somewhat porous it may stain more than you’d want with oil paint. Experiment on a few pieces to see what works before you commit to a full egg.
You should be able to find either India ink or oil paint in art and craft stores if you have any nearby, otherwise there’s always the trusty Amazon.com where you can pick up both. A little goes a long way. I’ve been using Higgins India Ink, though Windsor & Newton works well, and was what I used when I started.
As far as oil paint goes, you can get a six pack of assorted colors for the price of a single tube of some of the higher end, like Winsor & Newton, though if you’re just starting out, you may just want to work with black.
Here are my recommendations on where to start, let us know what works, it sounds intriguing!
— You will want to polish and seal the outer layer of the egg before you start. Sand it with 1000 grit sandpaper, then 1500 then 2000 grit to get the surface to a high polish. I wouldn’t use anything with liquid in it such as car polish unless you’re willing to wait a month or two for all the distillates to air out of it.
— After that you will want to “charge” a buffing wheel with bees wax (start up the buffing wheel and press a cake of bees wax against it until it begins to melt). Carefully buff the egg over a lot of fluffy pillows just in case you lose your grip! 😉
— Do this two or three times to seal the outer shell well. The wax shouldn’t interfere with any scribing lines and will only be on the surface. Once again, I’m shooting from the hip having only had duck egg omelets on occasion, never anything larger.
— Many people use a high-speed drill with a dental bit for the main lines, then go over it with an x-acto knife or scribing tool.
— When it comes to inking, I’d have an old t-shirt or other soft fabric handy. Place some ink on the scribed line then carefully wipe it away immediately to see if any staining occurs. If not, you may be able to let it sit for a little longer before you wipe it away, but you won’t want it to stay outside of the lines you’ve scribed and dry completely.
Hoping the best for your idea, send us pics of how you make out! If you need inspiration, check out “Egg-stacy Creations” – they’ve done some scrimshaw, though their strong suit is definitely their carving.
Could PTFE (Teflon) be used as a material?
Hi Dalton and thanks for writing! I’ve never used Teflon as a medium but that doesn’t mean it can’t be done. The only problem that may arise is keeping the pigment on the material. I’ve tried other plastics, and so far cast polyester, nylon and acrylic all work quite well since they’re all hard and take incisions as well as pigment well. If you have any on hand and do some scrimshaw, let us know how it works out, we’re always interested in new and novel materials we can practice our craft on!
Hey Andrew hope all’s well!
How can I upload a photograph of my scrimshaw sampling?
Can you use Corian for scrimshaw work?
Hi Dave, thanks for writing! Corian can be used for scrimshaw, it is slightly softer than ivory and sometimes has a difficult time holding pigments, but that will also depend on how you scrim your work. If you incise too deep, you not only make an indentation, you may also make “hills” on either side. A lighter touch and freshly sharpened tools are necessary. That being said, it is a versatile and sometimes inexpensive medium to scrimshaw on. You can cut and shape it into just about any shape desired, and if you know someone who does kitchen and bath remodeling, scrap pieces are often there for the asking. Many remodelers use the cutouts from sink counters to make cutting boards either for the person they are remodeling for or sell them on ebay after cleaning up the edges. Other scraps in many colors can be used for jewelry, knife handles, drawer pulls, and more.
If you show some interest in remodeling a bathroom in some of the big box stores you can often get small samples that you can use, and if you look online you can also purchase small sample tiles in many different colors.
Artist Nick Finocchio has done a portrait on this material that came out very well.
Let us know how you do – send a picture once you’ve done one you like!
Ha! I bought your book last night off Amazon Andrew so no worries about the plug 🙂 Looking forward to receiving it. I wonder if I am able to heat form this “milk plastic” though as I will be forming 3D shapes to scrimshaw into. I will investigate plastic supplies. Let the experimentation commence !
Thanks again for the advice, I appreciate it.
Merry Christmas!!
Sage <>
Also, are there any scrimshaw courses available in the UK?
I can only find courses by Sandra Brandy and Jim Stevens in the US. Thanks again!
Hi Sage, tattooing is quite similar to scrimshaw, in fact many patterns look great on ivory or alternative materials. Don’t know of any courses other than Sandra and Bob Hergert, aside from my book (shameless plug I know). If you go to the “How To Scrimshaw” page on my site you can see chapter 5 of my book which walks you through the initial scrimming and inking. If you have specific questions or run into a problem you can contact me at webmaster[at]scrimshaw.com. One excellent alternative material we can’t get in the states is made from “milk plastic” – basically it’s casein and formaldehyde. It’s available in the UK, often used for making knitting needles but looking around a few years ago I noticed sheets were available as well.
Let us know if we can help you in any way, and enjoy the craft!
Sincerely,
Andrew Perkins
Thankyou Andrew!
Wonderful to have made my very first Scrimshaw connection! I am very excited by the prospect of scrimming, especially onto my hats – I love drawing and it’s a beautiful way to convey my ideas, like moving canvases 🙂
I also tattoo by hand so it feels a natural progression into a a similar sort of technique. Do you please know of any other professional Scrimshaders ( if that is the correct name?) near London besides Joanne Ryall, whom I have already contacted and very much hoping to hear back from?
HeyHey,
Can I scrimshaw into thermoplastic after it has been formed into a 3D shape, would this type of plastic be suitable ?
Thanks!
Thanks for writing in! This is an interesting idea in a number of ways. Scrimming into thermoplastic will depend on the hardness of the plastic once it is set, and also it’s durability. A softer plastic would not be very suitable (one that is flexible) since the scribing and especially the punctures if you were doing pointillist scrimshaw would tend to “heal”itself, either pushing the pigment back out or obscuring it. If it is hard enough, everything from earrings to ornaments, pens to knife handles could be created with this technology. One of the reasons paper micarta is so popular with knife makers is it’s durability. Don’t know of any formulations of paper micarta for thermoplastic rendering, but it would be intriguing! Send us pics once you’ve created something, we’d be glad to display it!
Dumb question. If I use oil paint instead of ink, do I need to thin the paint into a liquid.
Hi Dee, and thanks for asking, that’s a good question! When I work with oil paint, I never cut it with anything: I wipe it on, then wipe it off with a lint free cloth. What you DO have to be careful of is you need to let it dry for several weeks before you put any type of archival wax on it, because if the paint is still wet, it will lift right out of the lines. That’s the only trade off. If I am doing black and white like the Kraken, I prefer oil paint. When it comes to color, I tend to go with India ink, since – well, I’m usually not wanting to wait several weeks for the black to dry. Patience is a virtue, for everyone else it’s black India ink!
Hello – I am trying to locate someone to do scrimshaw work on ivory for a pool cue. Any suggestions or references? Also need to know if ou have any sources for ivory in the US.
Thank you for your help –
Carol Smart
Thomas O’Connor
O’Connor Cues
Hello Carol, scrimshawing pool cues is an art unto itself. Working around the handle and creating a work of art on that curved surface takes a keen eye and a thoughtful patient scrimshander. That being said, there are two that I can think of right off the top of my head, and they would be Bob Hergert and Sandra Brady. Others on our page may do them as well, but if you go to https://www.scrimshaw.com/scrimshaw-artists/ and click on the mentioned artists, you can see their work. Hope this helps.
I am interested in learning this craft. I want to carve on bone. What to do to clean and prepare the bone for scrimshaw?
Hi, and thanks for writing! The easiest way to prepare bone for carving or scrimshaw is to buy soup bones from your local grocer, boil them for fifteen to twenty minutes, let them cool, then give them to your dog to clean. If you don’t have a dog to help you, once they are cool, you can let them cool, then scrape them clean with a knife. Getting the marrow out from inside is more tricky – the non-canine way is to cut them in half with a jig saw, then clean them and let them dry in the sun for several weeks.
Once dry, you can sand them down and polish them to a high luster using finer and finer sandpaper, dry sanding (not wet sanding). If you wet sand, you will need to let the bones dry again.
Note: Bone has small pores. These pores are where capillaries used to reach the marrow. It’s almost impossible to fill these pores with anything, though we’re still experimenting. One of the more popular ways (which is messy!) is to use crazy glue – the wet kind – not the gel: squirt a small area with the glue, then immediately sand the area. The glue dries quickly, the bone dust gets into the pores and it seals – up to a point. It is messy as I said, and you will use a lot of sandpaper. Another way is to just coat the bone with bees wax and polish with a buffing wheel. This will not fill the pores completely, but it will help.
The less ink you use on the bone, the cleaner it will look.
Hope this helps, one of my google+ friends Francesco works exclusively with bone, and likes the rough and rustic look and feel of bone. others agree. Still others like to work with antler, which also has the same inherent pores as bone – even more in fact.
If you want to buy bone that does not have this issue, you will need to look for “stabilized” bone – available from knifemakers, which is sealed by using a special liquid epoxy and pressure. It is more expensive but it’s close to ivory or acrylic as far as its workability.
Hope this helps,
Andrew
How do you feel about the high speed cutters, 400,000 rpm advertised? Have you used them or are they too untraditional? They are, imo, quite expensive and don’t look like as much fun.
As I recall, Sandra Brady (on our artists page) has used them, as have others. I have never used them myself, it seems better suited to carving (such as some artists do with ivory and ostrich eggs). Sorry I don’t have much experience with them. Anyone else have experience with high speed rotary cutters? Please feel free to help out bodhiblem with your opinions.
Can you please get back to me…I want to learn this art form, but I have only a million questions…please get back to mme so we may talk…Mike
Hi, and thanks for writing! You can start with the first 1,000 questions, then we can move on from there. Let me know what you would like to know, and I am sure we can walk you through just about anything you need.
i was wondering who the top 10 scrimshanders are today in the usa, thank you.
There are several that I can think of off-hand, most of them are on our artists page (https://www.scrimshaw.com/scrimshaw-artists/). Bob Hergert, Katherine Plumer, Jim Stevens, Tina White, Ron Lubke and Michael Cohen are the most sought after, some of my favorites are Rich Simmons (unique style), Scot Kimel (excellent artist, original ideas), Mary Mueller (great jewelry), Mark Thogerson (scrimshaw.net) and the list goes on. In my opinion, there are many artists underselling their work on Etsy – where you can get beautiful artistic work often for bargain prices. There are scrimshaw competitions that can be sought on the web that show many more artists who are “under the radar” – stellar works of art from names you almost never see or hear of. Hope this helps!