Category: Projects

Scrimshaw projects both current and past will be chronicled here

Buffalo Scrimshaw on Paper Micarta


Paper Micarta

Paper micarta - scrimshaw buffalo on slab, on top of thick cut paper micarta sheetPaper micarta is a composite material made from layers of paper and thermosetting plastic. There are other micartas as well, such as linen micarta and canvas micarta where they mix layers of linen or canvas. These materials are great for knife handles but interferes with scrimshaw since the materials are so thick, and they will wick the pigments. Another micarta like material uses fiberglass (called G10). It is extremely dense and stiff, unlike the Alternative ivory posted in a previous article.

Some people create their own micarta from old denim or paper and epoxy, pressing the materials under as much pressure as they can until dry, then cutting away any excess. This can be a messy and time consuming endeavor (see http://www.instructables.com/id/How-to-make-homemade-micarta/).

Paper micarta is mainly available as ivory, white or black. If you want to create an unique design, you may want to create a deep blue paper micarta and use a white pigment. This is in my bucket list, about the 17th in the line, behind the rest of the overflowing buckets…

Cutting paper micarta requires extremely sharp blades. Another thing you must use is a respirator rated for formaldihyde! This stuff smells terrible, and good ventilation is required as well. Cutting slow, especially with fretsaw blades will allow you to cut intricate patterns in just about any shape.  Read through the Material Safety Data Sheet (MSDS) so you know what you are working with. see: http://www.tmxaerospace.com/wcm/idc/groups/internet/documents/web_content/mdaw/mdi5/~edisp/dw022352.pdf for an example, and request a MSDS when you buy.

Paper micarta sands easily, files work well also. Once cut, shaped and wiped clean, paper micarta can be coated with a couple of coats of wood hardener from Minwax, though for this tutorial we’re trying renaissance wax. Polishing up to 3000 grit is highly recommended also (note: if you’re sealing the micarta with minwax wood hardener, polish it with 3000 grit after it has dried; if using renaissance wax, polish it before, apply the wax, then wipe away the excess renaissance wax with a soft cloth).

Most modern paper micarta is of high quality, though if the material is going to be used on a knife handle that will be getting wet, we’d definitely recommend sealing it.

Stipple and scratch, with callout where paper filaments have pulled away
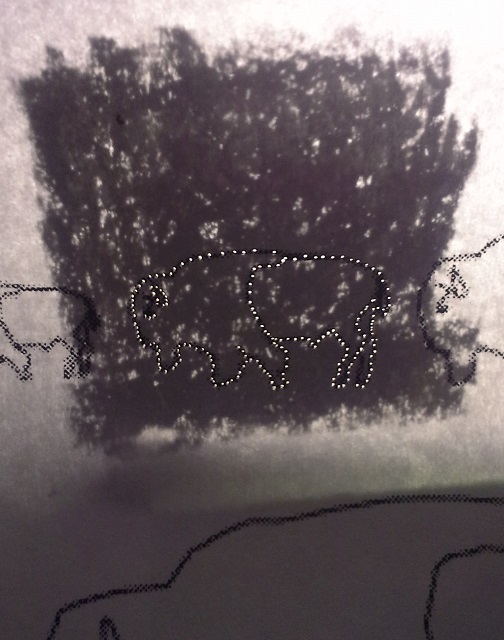
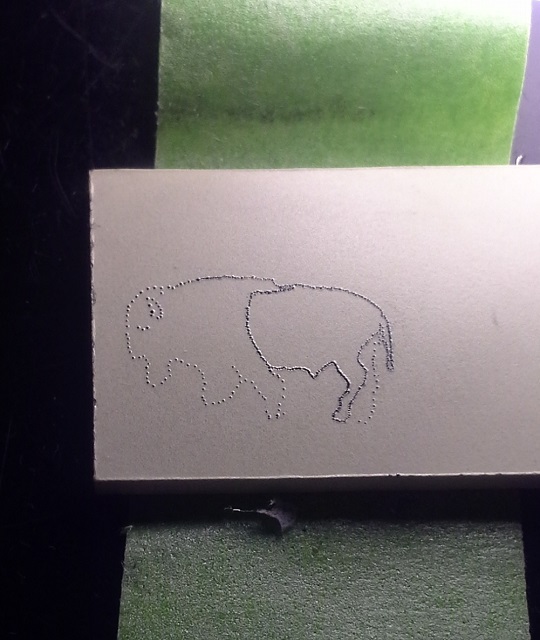
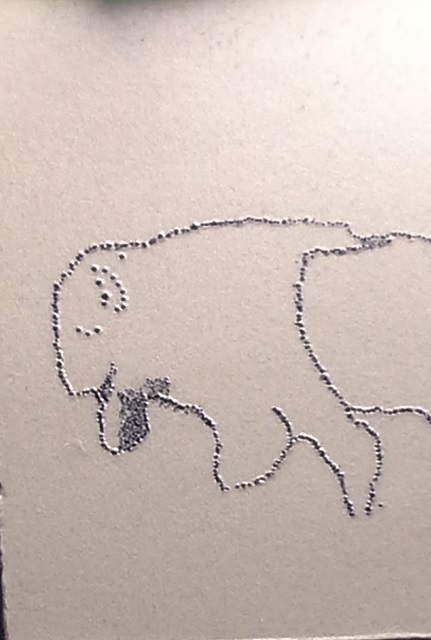
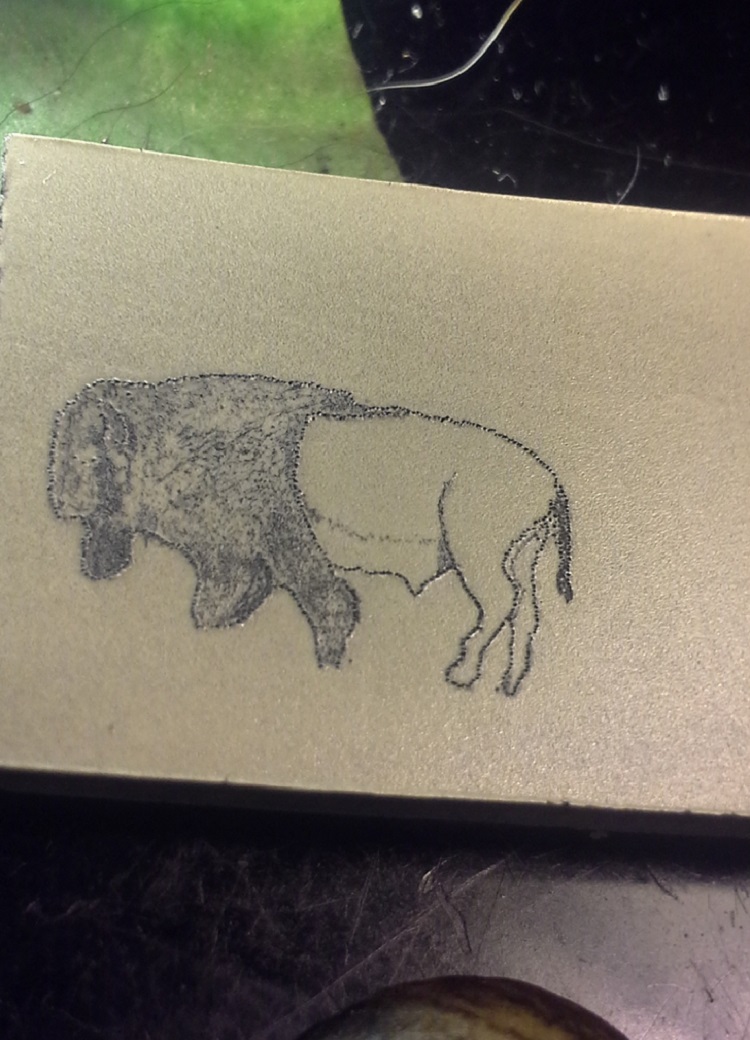
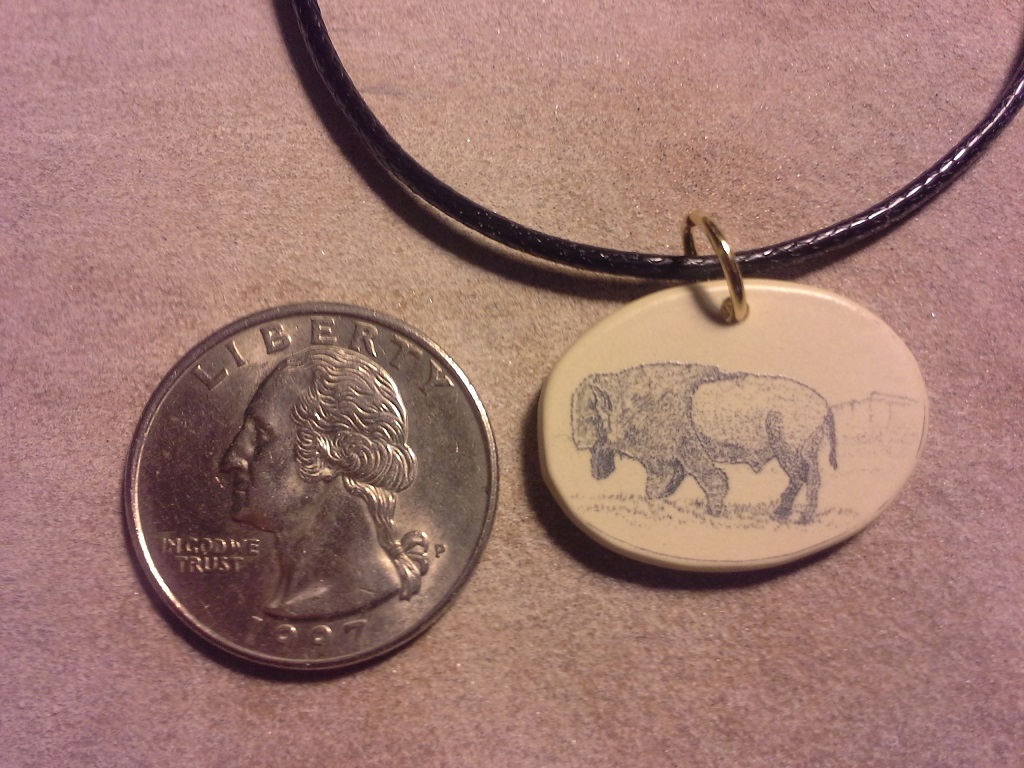
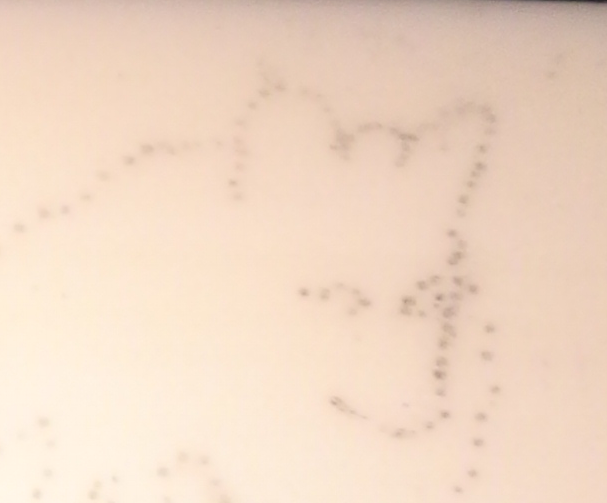
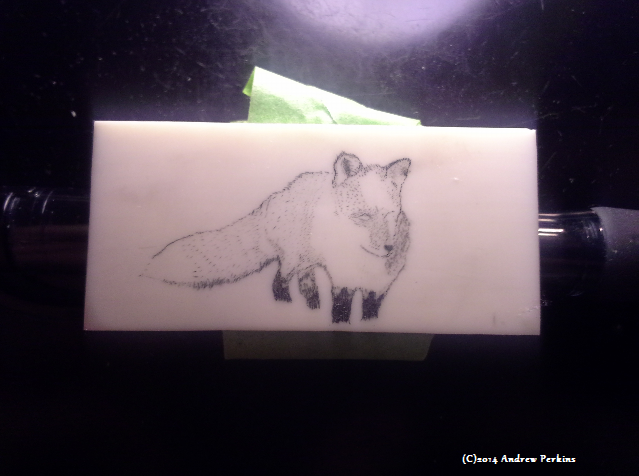
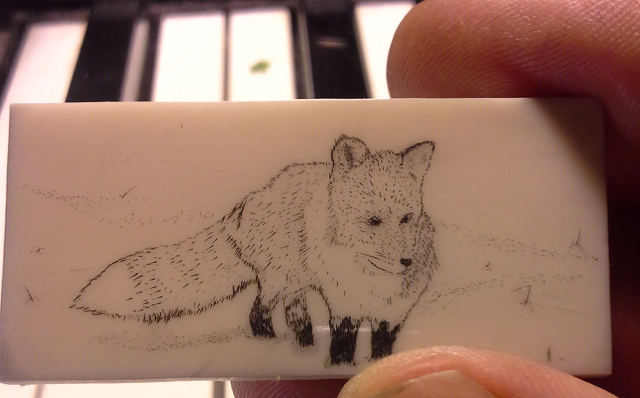
Paper micarta has a similar hardness to ivory, though we have found that it can stain slightly when using pigments due to its texture. We used a stipple technique on the bison using a Coulter scrimshaw scribe and found the material makes slight craters, not unlike softer mammoth ivory [photo]. It takes fine stippling well, and you can create dark areas with little difficulty.

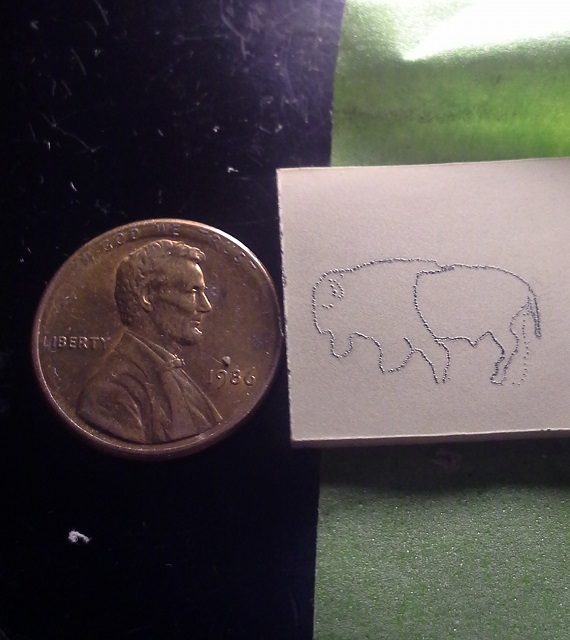
When it comes to scribing, paper micarta comes up short. The filaments of the paper will pull out making the edges of the lines slightly blurry. Clicking on the picture will bring up a larger image.

A very sharp stippling tool works best with paper micarta. If you are doing bolder lines and wish to scribe we’d recommend trying an X-acto type blade that is stropped so it will cut through the paper filaments instead of pulling them out, though we have not worked with this blade personally.

You can find paper micarta at Masecraft Supply in sheets, blocks and rods, as well as many of the knifemaker’s supply houses like USAKnifemaker, Texas Knife Supply, etc.

A good alternative to ivory, especially when it comes to stipple technique. Paper micarta can replace ivory as well as horn for knife handles as well as jewelry pieces. Similar hardness to ivory, it’s only drawback is when it comes to scribing technique where the paper filaments tend to pull and create fuzzy lines instead of clean lines. Takes ink well, oil paint also works – we applied it and immediately wiped it off with no staining if the surface was polished smooth.

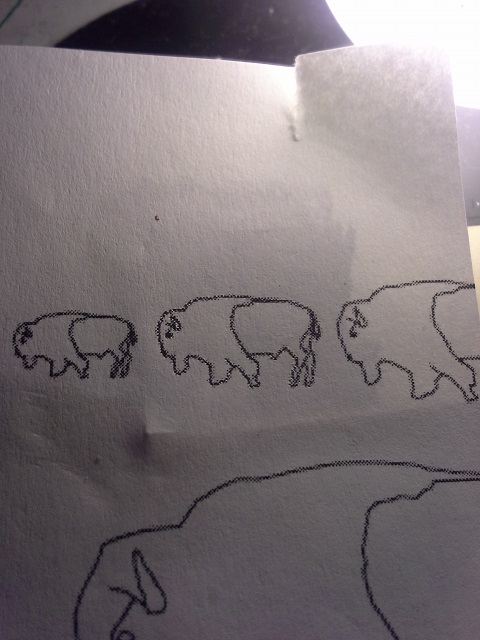
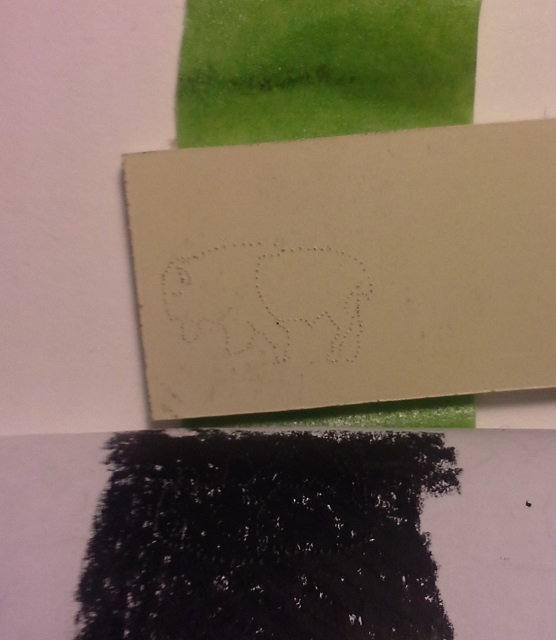
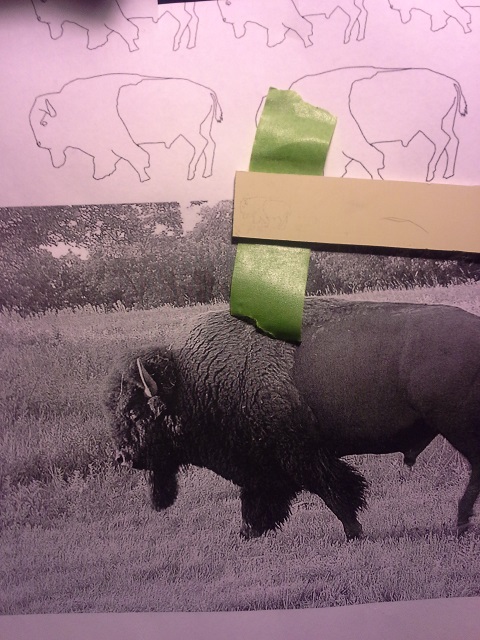
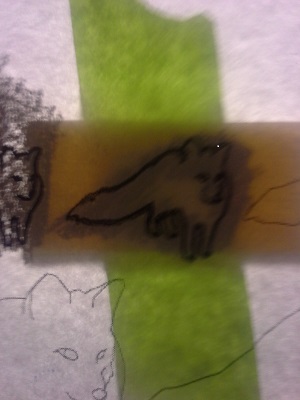
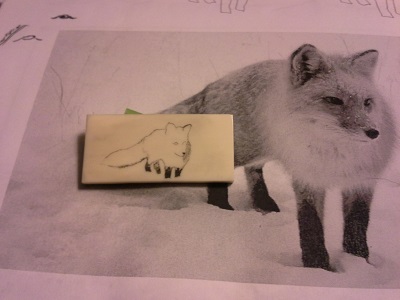
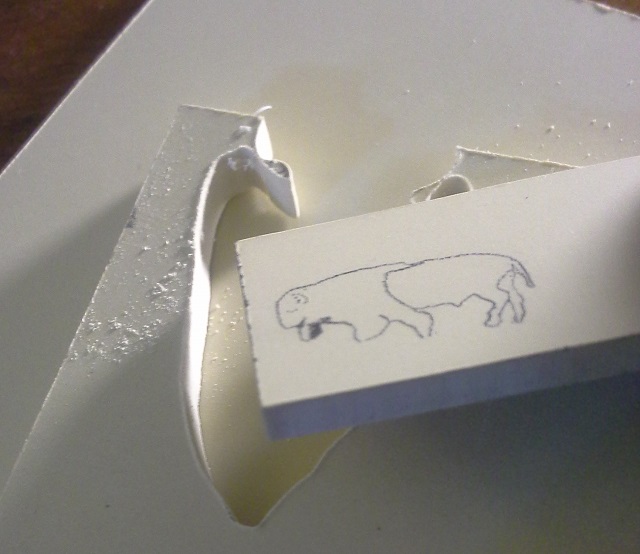
Below is a series of pics of a scrimshaw in progress of a buffalo on paper micarta.  We’re using the stipple technique to keep the image sharp.

buffalo template from "scrimspirations Book 1"
Paper micarta under the second buffalo, the back of the paper is scribbled with a china marker to make the stipple dots show up easier
Paper lifted up once the stippling was completed. Lit from behind.
Stippled buffalo on paper micarta.
Buffalo template from "Scrimspirations Book 1". Photo Credit:USFWS with the piece of paper micarta on top.
Buffalo template from “Scrimspirations Book 1”. Photo Credit:USFWS
Stippling of the Buffalo in progres on paper micarta.  Hind portion outline stippling completed, front portion not finished.
Stippling of the Buffalo in progress (okay, technically an American Bison).
Penny to the left, Bison scrimshaw on paper micarta to the right.
Scrimshaw of Bison (in progress) with penny shown for scale. Looks like President Lincoln is sweating a little…
Light angle shows the slight "cratering" from the stippling technique.Light and close stippling on the "beard" shows far less cratering.
Light angle shows the slight “cratering” from the stippling technique.Light and close stippling on the “beard” shows far less cratering.
Buffalo scrimshaw on paper micarta in progress
Playing with textures on the buffalo. Started with stipple, but the tufts presented a challenge for technique and patience.
Finished Buffalo on Micarta next to quarter on left
Finished, except for replacing the gold loop with silver (when they arrive) and signing the back. Cutting a finished piece out of a rough is not for the faint of heart – or the impatient!

Project: Fox in the Snow – Scrimshaw on Alternative Ivory

Along with testing alternative materials, I get to create pieces of art and refine my techniques. With Alternative Ivory, I’ve been working on a “Fox in the Snow” – a picture by Rob Lee on Flickr.com. This post will be updated and edited as I find interesting information and will pass along any tips and techniques as well.

As stated in the newsletter we found that coating the back of the image to be transferred with an aquarelle pencil then taping the piece to the back of the paper and using the “dot-to-dot” technique on the front pressed the pigment into the material without having to press hard enough to completely pierce the paper. This created smaller dots that were easily seen with magnification but could be ignored during the scrimshaw process and would not detract from the final image.

This is one of the few “furry” scrimshaw pieces I’ve done, mostly working with the more traditional ships and waves, lighthouses and flowers with the occasional loon done on commission. I’m a great fan of Katherine Plumer, who can capture dogs, cats, bears – you name it with such realism that I am in constant awe.  She created a piece with a dog and showed the progression, saving the eyes for last. I’ve got the eyes of the fox “sketched” in where I think they need to be but I’m also saving them for last. “Romeo” in progress, and “Romeo” finished shows a level of artistry and technique I hope to attain (it’s in my bucket list).

So, here’s the progress so far:

Picture of the fox printed on paper with the underside scribbled over with an aquarelle pencil, the alt ivory taped to the bottom with green masking tape.
The paper is on top, the back has been scribbled on with an aquarelle pencil. The alternative ivory is the next layer, then the tape. Picture taken with light behind the paper.
After removing the paper from the alternative ivory that had the underside coated by scribbleing with an aquarelle pencil, the dots are easily visible and not as deep.
After creating the “stipple dots” with the pigment underneath, the dots are easily seen and the dots are much smaller.


Fox scrimshaw on alternative ivory - photo by Rob Lee on Flickr.com
It’s cold in the snow, so I went ahead and put his boots on…
scrimshaw of a fox in the snow on alternative ivory in progress as of 2014-05-31
Filled in the darker fur and some of the ear details.
Fox in the snow in progress 2014-06-01
2014-06-01 Added the eyes and more detail, looked at the pic and realized it needs more shading
Bee Eater Scrimshaw on Mammoth Ivory and on a Lightswitch

Bee Eater Scrimshaw on Mammoth Ivory and on a Lightswitch

Bee-Eater on Mammoth Ivory, Andrew Perkins, 2010

Bee Eater Scrimshaw on Mammoth Ivory and on a Lightswitch

The Williamsburg Church Fair has come and gone, and I couldn’t squeeze in the time to create a Williamsburg themed scrimshaw.  So instead, I brought along a Bee Eater Scrimshaw on Mammoth Ivory.  The fair went well, they were able to raise over $6,000, though I’m sure my scrimshaw only did a fraction of a percentage of that much.  The hasty picture I shot was in a frame that I removed since I couldn’t get the glass clean – something left a film on it I couldn’t get rid of.

Bee-Eater on lightswitch 2010

I had done one bee eater on a lightswitch before I had done the one on the mammoth ivory (pictured).  They were both done in stipple style.  The light switch took an incredible amount of time as I remember, I was pleased when I moved back over to the ivory.  Light switches are made of nylon, which is a lot harder than ivory, and I did not have my trusty Coulter precision scrimshaw tool at the time.  I will have to do another lightswitch using this tool to see how it works.

I have a few scrimshaw kits available which I will be selling soon (sold out of the last batch before I could put them online!).  I will be adding a digital copy of “The Scrimshander’s Secret Scrapbook of Whaling Era Illustrations” to the four remaining color kits.  Email me at aperkins@scrimshaw.com with “Scrimshaw Kit Early Bird” in the subject before I get them on the Scrimshaw Kit page and I’ll put in a little extra something for you, too, as long as there are any left.  They will be selling for $39.95 shipped USPS Priority Mail.

Kraken Scrimshaw – SOLD

Kraken Scrimshaw – SOLD

Kraken in frame with parchment

Finally finished the Kraken scrimshaw with a coat of archival wax and a couple of touchups. “The Kraken is a mythical sea monster first documented in 1250 in Iceland. Pierre Denys de Montfort penned the original illustration in 1801, after he was inspired by a description from 1783 of an eight-metre long tentacle found in the mouth of a sperm whale. The ancient piece of mammoth ivory measures 15/16″x 1-1/2”, and was hand scribed using a tungsten carbide scribe from Coulter Precision Tools (also on Etsy). The pigment is Windsor and Newton Oil Paint, has been coated with an archival wax and placed inside a frame. Comes with a write-up about the piece signed by the scrimshaw artist including “Kraken Lore” and the care of ivory. I do very few pieces during the year, and this one was done over several months in early 2012.

Available at Etsy.com

Kraken Scrimshaw completed and under glass

Kraken Blog – The Home Stretch

Kraken Blog – The Home Stretch


After starting a truss rod cover for fun, then realizing I just committed to making a left-handed cover instead of the right handed cover intended, I went back to the Kraken to fill in the waves and darken it down to balance it.  At this point it will sit for a week or so to let it kind of gel in my mind.  The left hand side needs one line removed, the right hand side needs the mountains “de-stippled”, but beyond that, it’s done – or at least I am done working on this piece.  You realize at some point that this is as far as you can go with a piece of scrimshaw, and if you continue on fixing this and “improving” that, you will end up sanding it down and having nothing but ivory dust to show for it.  I am close to this point on the Kraken, and have learned a lot at every session.  Once complete, it will get a couple of coats of archival wax, then it will either go onto etsy.com or be sold elsewhere.

Kraken scrimshaw - Just a little clean up and it's complete!


Digital pictures are a blessing, since I will have copies of the whole process, and will keep them on the site as well.  The sun has finally come out, and it’s time to get on to growing things, but there will still be Saturday mornings devoted to nice quiet bug-free work over coffee and ivory.